
Réalisation et rédaction Sihame Cornetet.
Relecture Aurore Strange (merci !).
Ce tutoriel fait suite à notre article sur le gant féminin du XIIIe siècle. Nous sommes particulièrement fiers car ce dernier a fait l'objet d'une note proposée
par Véronique MONTEMBAULT, docteur en archéologie, ethnologie et préhistoire.
Le présent article est consacré à la réalisation de deux paires de gants longs basée sur l'observation des sources et les informations livrées par les textes du XIIIe siècle, sans oublier le rapport de restauration des gants de Teresa Gil.
Le tutoriel comporte quatre parties. Dans la première vous sera proposée la préparation d'une toile, c'est-à-dire un essai sur tissu rigide. Cette étape permettra de dégager un patron qui fera l'objet d'une présentation dans la deuxième partie. La troisième sera consacrée à la couture des gants et enfin, la dernière contiendra l'explication en images et en vidéo des points utilisés pour la confection.
This tutorial follows our article on the 13th century female glove. It's dedicated to the creation of two pairs of long gloves based on the observation of the sources and the information delivered by the 13th century's texts as well as the report of restoration of the pair of Teresa Gil's gloves.
The tutorial has four parts. In the first one you will be offered the
preparation of a toile, that is to say a test on rigid fabric. This step will make it possible to identify a pattern which will be the subject of a presentation in the second part. The third part
will be devoted to the sewing of gloves and finally, the last will contain the explanation in image and video of the points used for the confection of the two pairs of gloves.
I. PRÉPARATION DE LA TOILE - PREPARATION OF THE TOILE
La préparation de la toile, première étape de notre réalisation, est d'autant plus
importante qu'elle permettra d'éviter de gâcher du cuir en servant de patron.
The preparation of the toile, the first step in our realization, is all the more important as it will avoid wasting leather by serving as a pattern.
Le matériel - Equipment
Cette étape demande peu d'équipement, cependant, armez-vous de patience, vous en aurez besoin !
Il vous faut :
-
une grande et une petite paire de ciseaux
-
un carré de 50 cm x 50 cm de toile blanche*
-
des épingles
-
du fil de couture autre que blanc
-
une aiguille
-
un crayon ou un stylo
* Choisissez une toile tissée serrée et plutôt épaisse. C'est important pour vous rapprocher au mieux de l’épaisseur du cuir. Évitez les tissus qui s’effilochent.
This step requires little equipment. However, arm yourself with patience, you will need it!
You need:
- a large and a small pair of scissors
- 50cm x 50cm square of white canvas*
- pins
- a sewing thread other than white
- a needle
- a pencil or a pen
* Choose a tightly woven and rather thick fabric. This is important to get as close as possible to the thickness of the leather. Avoid fabrics which easily fraye.

Le patron de base - Basic pattern
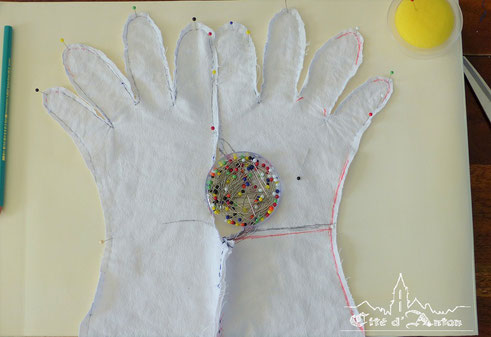
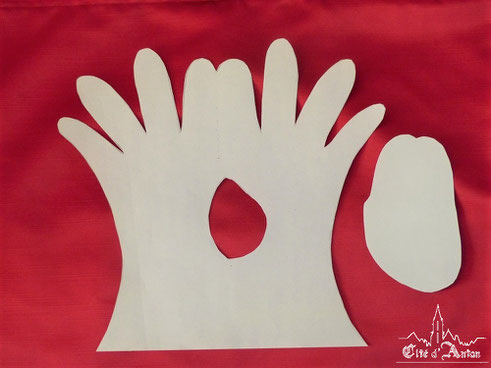
L'étape suivante consiste à dessiner la forme de votre main. J'ai volontairement écarté les doigts, car je débute dans la réalisation de gant. De plus, les gants de cette période ne comportant pas de fourchettes mais de simples losanges à la base des doigts, je voulais m'assurer d'avoir suffisamment de matière pour chacun d'entre eux.
Le contour de la main est tracé sur la toile pliée en deux pour les deux mains (droite et
gauche).
The next step is to draw the shape of your hand. I voluntarily spread my fingers, because I am a beginner in the realization of gloves. Moreover, because the gloves of this period don't have fourchettes but simple diamonds at the base of the fingers, I wanted to make sure I had enough material for each finger.
The outline of the hand is drawn on the canvas folded in half for both hands (right and left).
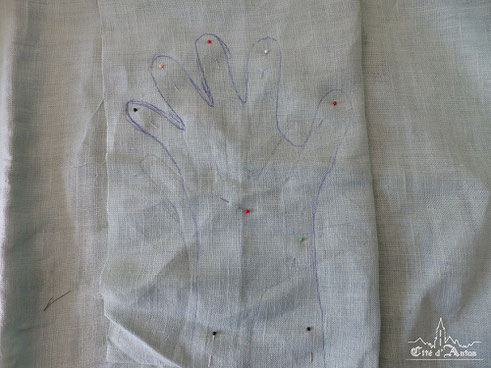
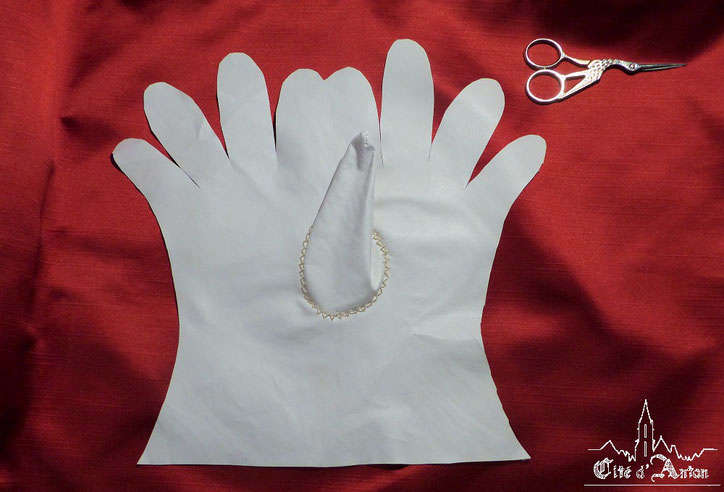
Vous remarquerez aussi que le patron présente un pouce intégré, c'est normal. C'est un choix. Je voulais être en mesure de tracer le patron du pouce directement sur le gant porté afin d'obtenir un résultat satisfaisant.
You will also notice that the toile has an integrated
thumb, that’s normal. It’s a choice. I wanted to be able to trace the pattern of the thumb directly on the glove worn in order to obtain a satisfactory result.
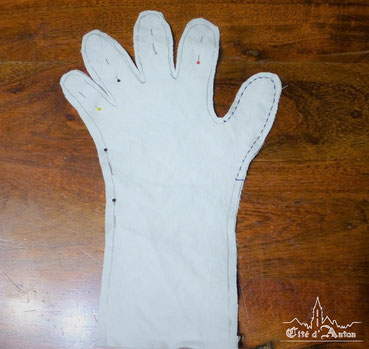
Couture de la toile - Toile sewing
Une fois les deux pièces de tissu découpées, je les fixe entre elles à l'aide d'épingles et je commence la couture sur la ligne tracée au crayon.
La ligne de la couture qui reliera le pouce au reste de la main ne sera tracée qu'une fois la toile achevée et portée.
Once the two pieces of fabric have been cut, I fix them together with pins and I start sewing on the line drawn in pencil.
The line of the seam that will connect the thumb to the rest of the hand will not be drawn until the toile is completed and worn.
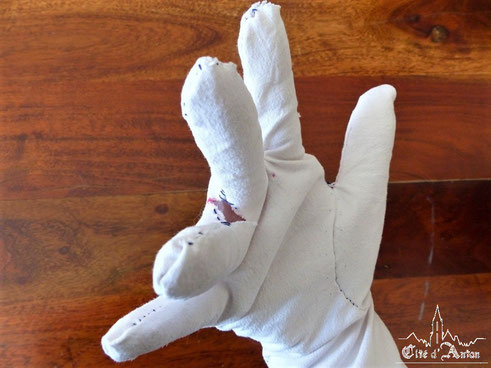
Ajustements - Adjustments
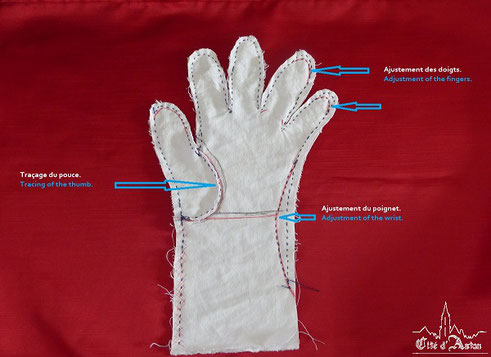
La couture terminée, j'enfile le gant et ajuste doigt par doigt. Ensuite, je trace le contour du pouce. Il est plus facile d'ajuster un patron un peu large que de rectifier un patron trop petit. Tout ceci est fait sur l'envers du gant.
Once the seam is finished, I put on the glove and adjust finger by finger. Then I trace the outline of the thumb. It's easier to adjust a pattern that is a bit to wide than to rectify one that is too small. All of this is done on the wrong side of glove.
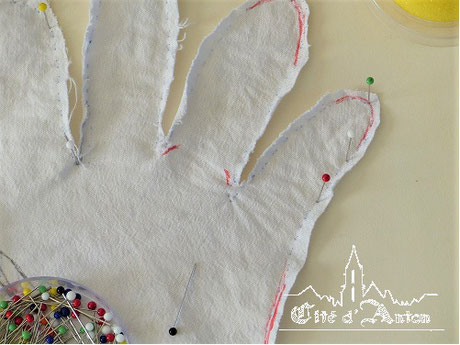
Vous pouvez voir sur la fig. 04 les traits rouges correspondant à des ajustements faits
directement sur le gant porté. Je recouds ensuite sur la nouvelle ligne tracée. Les fig. 05, 06 et 07 montrent les détails des ajustements.
You can see on the fig. 04 the red lines that correspond to adjustments made directly on the worn glove. I then sew on the new line drawn. Fig. 05, 06 and 07 show the details of the adjustments.


De gauche à droite, Fig. 05, Fig. 06 et Fig. 07 - Détails des ajustements.
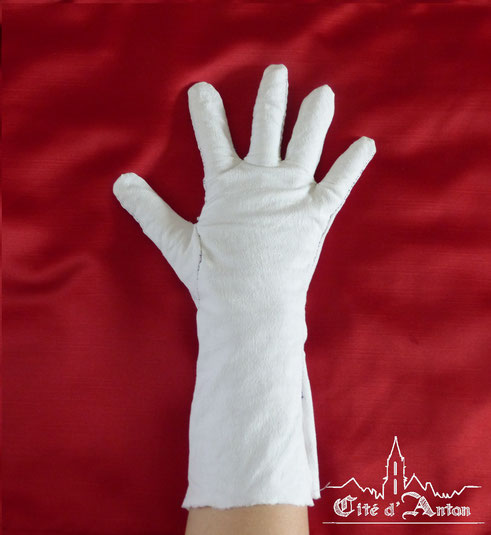
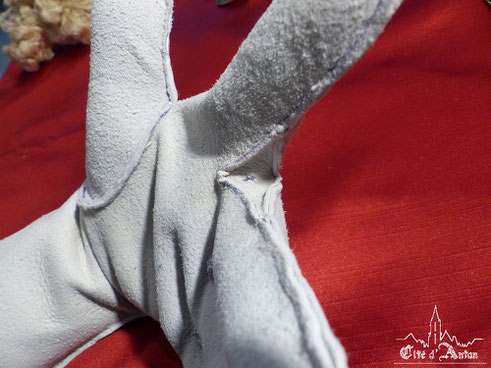
Toile finie - Finished toile
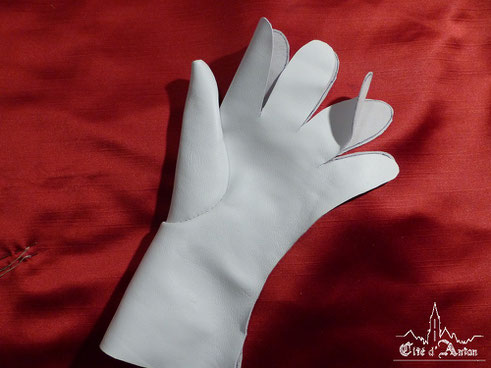
Une fois les ajustements terminés, je retourne le gant sur l'endroit et l'enfile. Voici le résultat côté dos et côté paume. Vous remarquerez la tension au niveau de la base des doigts, nous y reviendrons plus loin.
Once the adjustments are made, I turn the glove over and put it on. Here is the result on the back and on the palm sides. You will notice the tension at the base of the fingers, we will come back to it later.

II. LE PATRON - PATTERN
Une fois que l'essayage donne un résultat satisfaisant, on retourne à nouveau sur l'envers.
Prévoyez une feuille suffisamment grande pour accueillir le patron complet. Le gant est positionné sur le papier (prévoir un support souple) et fixé grâce à des épingles en suivant les lignes de couture (cf. fig 10).
Once the fitting gives a satisfactory result, turn the toile on the wrong side once again.
Provide a sheet large enough to have the complete pattern. The glove is positioned on the paper (think to have a flexible support) and fixed with pins following the seam lines (cf. fig 10).
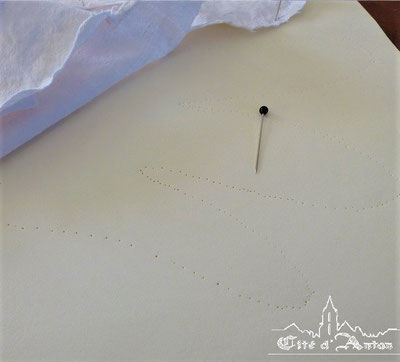
La forme du gant est obtenue grâce aux marques des épingles (fig. 12), il n'y a plus,
ensuite, qu'à la retracer en suivant les points. Pensez à ajouter une marge de couture (fig. 13)
The shape of the glove is obtained thanks to the marks of the pins (fig. 12), then you just have to redraw it by following the points. Don't forget to add a seam allowance (fig 13).
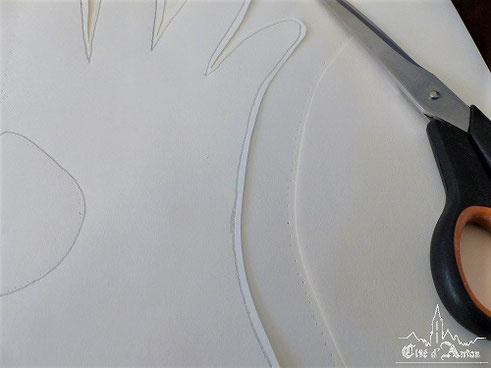
Ci-contre, le patron fini.
Here is the finished pattern.
Afin de m'assurer de mon patron, j'ai refait un ultime essai avec une nouvelle toile (étape facultative). On voit bien sur l'image ci-contre qu'une tension existe à la base des doigts. Le problème sera résolu avec la pose de losanges comme ceux cités dans le rapport de restauration des gants de Teresa Gil.
To be certain of my pattern, I did a final test with a new toile (optional step). We can clearly see on the image opposite that a tension exists at the base of the fingers. The problem will be solved with the adding of diamonds like those mentioned in the restoration report of Teresa Gil's gloves.
III. COUTURE DES GANTS - GLOVES SEWING
« Et por garder que ses mains blanches
Ne halaissent, ot uns blans gans.
»
Roman de la Rose
Dans les sources textuelless, c'est le cuir blanc de chevreau qui est le plus cité lorsqu'il s'agit de gants. Néanmoins, des gants en cuir d'agneau, des cuirs teints et des gants en soie sont également mentionnés.
Pour réaliser ma première paire de gants, j'ai donc utilisé un cuir d’agneau blanc. D'une épaisseur de 0,9 mm, il reste assez souple. Il est important de préciser que le cuir n'a pas subi un tannage végétal.
In textual sources, white kidskin is the most cited when it comes to gloves. However, lambskin gloves, dyed leathers and silk gloves are also mentioned.
To make my first pair of gloves, I used white lambskin. With a thickness of 0.9 mm, it remains quite flexible. It's important to note that this leather hasn't been vegetable tanned.
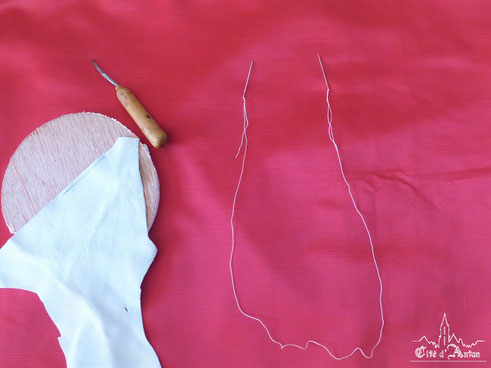
Traçage du patron - tracing the pattern
Le patron est reporté sur l'envers de la peau, côté chair. Les deux mains et les deux
pouces sont tracés en miroir pour éviter toute erreur.
The pattern is transferred on the wrong side of the skin, the flesh side. Both hands and both thumbs are mirrored to avoid errors.

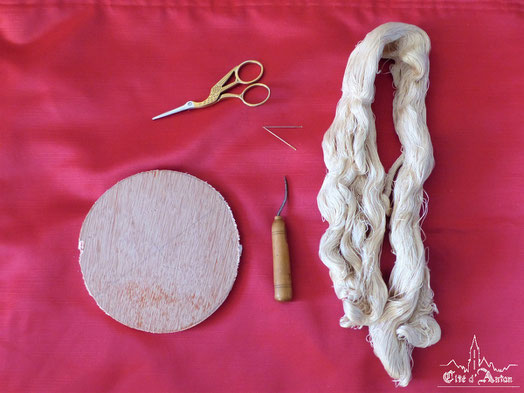
Matériel - Equipment
Cette partie de la réalisation nécessite peu de matériel. Voici ce que j'ai utilisé pour coudre la paire de gants :
-
une planche pour faire les pré-trous
-
une alène
-
du fil de soie
-
deux aiguilles à pointe arrondie (aiguilles à tapisser)
This part requires little material. Here’s what I used to sew my pair of gloves :
- a board to make the pre-holes
- an awl
- silk thread
- two rounded point needles (upholstery needles)
Couture - Sewing
Le premier gant cousu est le droit. Ainsi, à l'envers, il sera plus aisé de l'ajuster sur la main gauche, étant droitière.
Le point utilisé est le point sellier. Ce dernier est expliqué à la fin du
tutoriel.
The first glove sewn is the right. So, upside down, it will be easier to adjust it on the left hand, being right-handed.
The stitch used is the saddle stitch, which is explained at the end of the tutorial.
1. Le pouce - The thumb
La première étape consiste à coudre le pouce et à le rapporter sur la main.
The first step is to sew the thumb.

Si le pouce est un peu grand, des ajustements pourront être faits une fois l'ensemble
cousu. Le pouce est agrémenté d'une couture au point zigzag, comme vous pouvez le voir sur l'image ci-dessous. Ce point est expliqué à la fin du tutoriel, dans la partie IV.
If the thumb is a bit large, adjustments can be made later.
The thumb is embellished with a zigzag stitch, as you can see in the image below. This point is explained at the end of the tutorial, in Part IV.
2. Les autres doigts - Other fingers
L'étape suivante consiste à coudre les autres doigts en s'arrêtant environ 2 cm avant leur base (= zone de tension) ; emplacement prévu pour accueillir les losanges. Voyez le résultat obtenu cf. Fig. 21, 22, 23 et 24.
The next step is to sew the other fingers, stopping about 2 cm before their base (= area of tension); there, there will be the diamonds. See the result on the fig. 21, 22, 23 and 24.

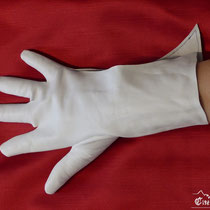


Fig. 22 Fig. 23 Fig. 24 Fig. 25
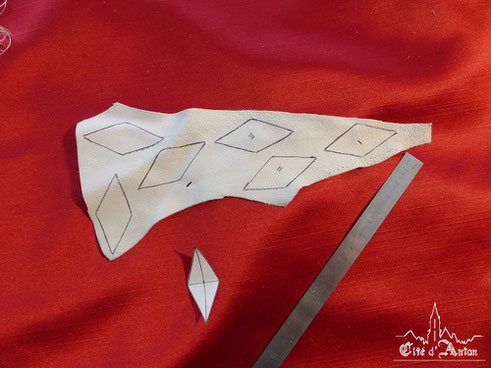
3. Les losanges - Diamonds
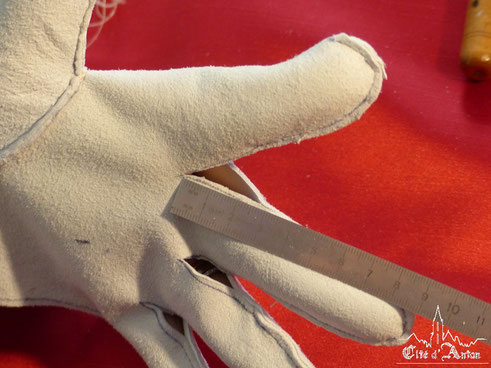
Une fois les doigts cousus, mesurez la distance entre deux doigts afin de pouvoir tracer
les losanges : hauteur sur le doigt et espace entre le dos et la paume (cf. fig. 26 et 27). Comme le rapport de restauration des gants de Teresa Gil ne donne pas de précision sur les mesures de
ces pièces, je me suis basée sur l'endroit de la tension pour les mesurer.
Once the fingers are sewn, measure the distance between two fingers so that you can trace the diamonds: height on the finger and space between the back and the palm (see fig. 26 and 27). As the restoration report of Teresa Gil's gloves doesn't give any details on the measurements of these parts, I used the location of the tension to measure them.

Tracez les losanges selon vos mesures. Reportez sur le cuir puis découpez. Les pièces sont ensuite cousues à la base des doigts (cf. fig. 28), en commençant par un des angles. Les losanges sont cousus en faisant deux ou trois passages au niveau des angles. Ces derniers étant des zones de tension, il faut s'assurer de la solidité (cf. fig. 29).
Trace the diamonds according to your measurements. Transfer to the leather then cut out. The pieces are then sewn at the base of the fingers (see fig. 28), starting at one of the corners. The diamonds are sewn by making two or three passes at the corners. These are areas of tension, it is necessary to ensure the solidity (cf. fig. 29).
Ajustements
Une fois les losanges cousus, effectuez les derniers ajustements. Voici comment procéder :
-
retournez le gant à l'envers,
-
marquez au crayon la ligne de la future couture,
-
tracez la ligne,
-
cousez en débordant sur la précédente ligne de couture,
-
coupez la partie en trop.
Once the diamonds are sewn, you have to make final adjustments. Here is how to proceed:
- turn the glove upside down,
- pencil mark the line of the future seam,
- draw the line,
- sew over the previous sewing line,
- cut the extra part.


Fig. 30 - Pouce long. Fig. 31 - Traçage de la ligne. Fig. 32 - Découpe du surplus.
À présent, le côté extérieur peut être cousu puis le gant retourné. Voici le résultat. Il
reste encore l'ourlet à faire et la couture en zigzag du pouce. Je précise que, sur cette première paire, j'ai d'abord oublié cette fameuse couture, elle a été ajoutée par la suite. Pour la
seconde paire, cela a été fait avant de coudre les autres doigts (cf. fig. 21), pour plus de facilité.
Now the last side can be sewn and the glove turned inside out. Here is the result. There is still the hem to make and the zigzag seam of the thumb. I specify that, on this first pair, I first forgot this seam, it was added later. For the second pair, this was done before sewing the other fingers (see fig. 21), for convenience.


Fig. 33 - Paume. Fig. 34 - Dos. Fig. 35 - Losanges Fig. 36 Pause détendue.
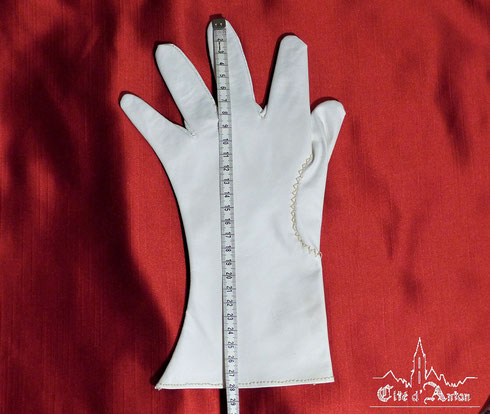
Les gants finis mesurent 28 cm, la même longueur que ceux de Teresa Gil.
The finished gloves measure 28 cm, the same length as those of Teresa Gil.
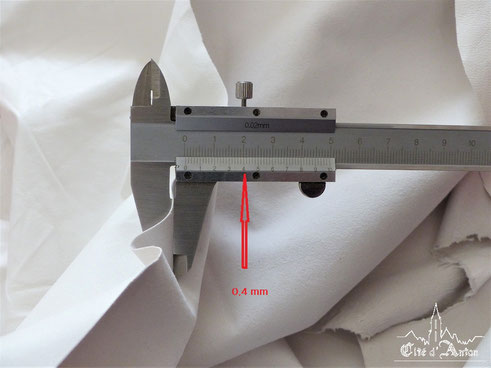
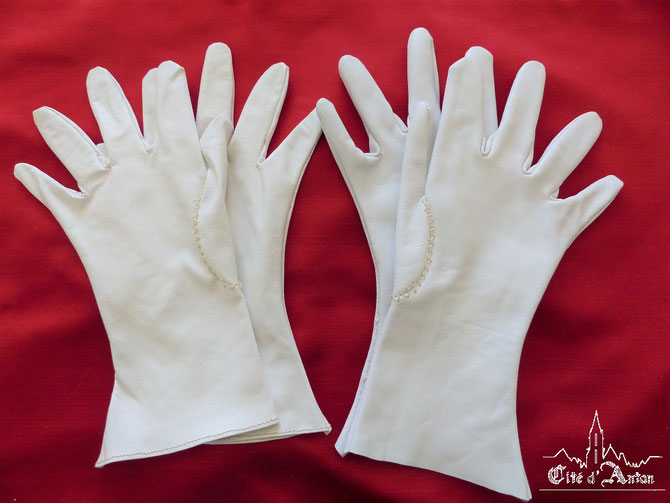
Gants finis - Finished gloves
Voici la seconde paire réalisée dans un cuir de chevreau blanc, comme pour les gants de
Dona Teresa Gil. Il est de 0,4 mm d'épaisseur. Ces gants sont très souples et très confortables. L'ourlet a été réalisé avec un point arrière afin que le couture ne se défasse
pas.
Here is the second pair, made in white kidskin leather as for Dona Teresa Gil's gloves. It's 0.4 mm thick. These gloves are very flexible and very comfortable. The hem was made with a back stitch so that the seam doesn't come apart.

Comme vous pouvez l'observer sur l'image ci-dessous, l'ourlet du bas des gants n'est fait
que sur une seule paire, celle de gauche.
As you can see in the image below, the bottom hem of the gloves is only made on one pair, the one on the left.
IV - POINTS UTILISES - USED STITCHES
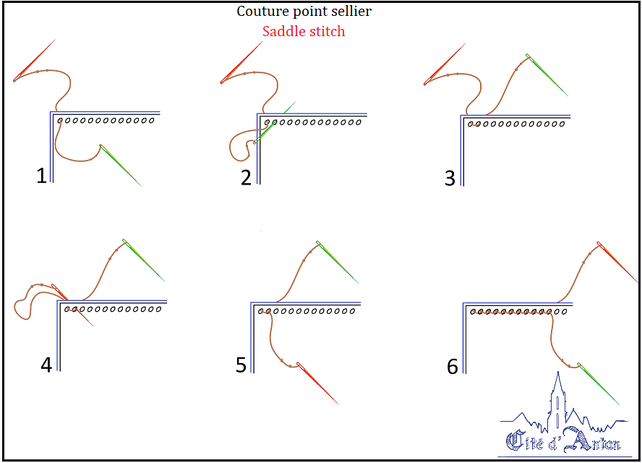
1. La couture au point sellier - Saddle stitch
Sauf pour le pouce, aucun type de point n'est cité dans le rapport de restauration des gants de Teresa Gil, les fils des coutures étant bien trop détériorés. L'utilisation du point sellier relève donc un choix personnel. Il se réalise avec deux aiguilles sur le même fil.
Voici comment préparer votre matériel. Le fil ne doit pas dépasser une brassée, grosso modo il doit être équivalent à 5 fois la msesure de ce que vous allez coudre. Suivez la démonstration dans la vidéo pour réussir les nœuds de blocage.
N'ayant pas de griffe pour marquer les pré-trous, j'ai percé le cuir directement.
Except for the thumb, no type of stitch is mentioned in the restoration report of Teresa Gil's gloves, the threads of the seams being far too deteriorated. The use of the saddle stitch is therefore a personal choice. It's done with two needles on the same thread.
Here's how to prepare your materials. The thread shouldn't exceed 5 times the measurement of what you are going to sew. Follow the demonstration in the video to make the blocking knots.
Having nothing to mark the pre-holes, I pierced the leather directly.
Préparation de l'aiguillée.
Preparation of needles.
À présent, vous pouvez réaliser votre point sellier en suivant les instructions
ci-dessous.
No you can proceed by following the instructions below.
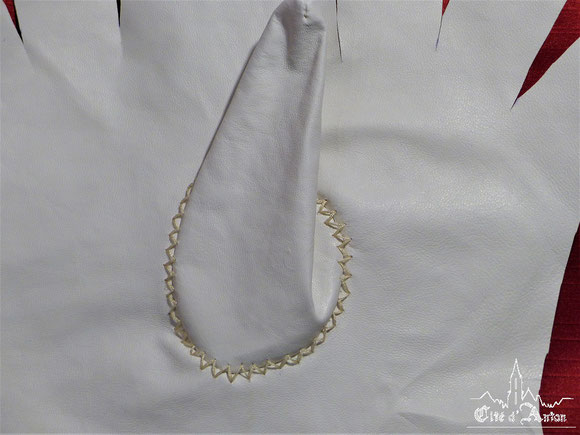
2. Le point de zigzag - Zig-zag stitch
Avant de vous montrer comment réaliser le point zigzag, il est important de vous
expliquer mon choix de couture pour le pouce. Il est noté dans le rapport de restauration que le point zig-zag a été utilisé comme point d'assemblage du pouce au reste du gant. J'ai donc fait un
test. Voici le résultat ci-dessous.
Before showing you how to make the zigzag stitch, it's
important to explain my choice of stitching for the thumb. In the restoration report, it's mentioned that the zigzag stitch was used for joining the thumb to the rest of the glove. So I did a
test. Here is the result below.


Fig. 42 - Pré trous. Fig. 43 - Point zig zag. Fig. 44 - Envers. Fig. 45 -Tension.
Le point a été réalisé sur l'endroit du cuir. Il permet d'obtenir un bord à bord parfait.
CEpendant, la moindre tension, comme le montre la fig. 45, écarte les deux pièces de cuir. Le rapport de restauration ne donne pas plus de précision sur la couture d'assemblage du pouce. Pour
cela et par crainte de fragiliser mes gants, j'ai fait le choix de coudre le pouce comme les autres doigts et d'ajouter le point zig-zag comme couture de finition.
The stitch was made on the right side of the leather. It provides a perfect edge to edge. However, the slightest tension, as shown in fig. 45, push aside the two pieces of leather. The restoration report doesn't give more details on the stitching of the thumb. Because of this and because of the fear of weakening my gloves, I chose to sew the thumb like the other fingers and add the zig-zag stitch as a finishing seam.
Le point de zigzag est un point de broderie ou de finition. Il est facile à réaliser et se fait sur l'endroit des gants. Je vous conseille, toutefois, de faire votre point de zigzag avant la couture des autres doigts, comme indiqué plus haut (cf. Fig. 38).
The zig-zag stitch is an embroidery or finishing stitch. It's easy to make and done on the right side of the gloves. However, I advise you to make your zig-zag stitch before sewing the other fingers (cf. Fig. 38).
Ci-dessous, un tutoriel pour le point zigzag.
Below is a tutorial for the zig-zag stitch.

Écrire commentaire
Claire (jeudi, 23 juillet 2020 14:59)
bravo pour ce tutoriel très complet !
Sihame (vendredi, 24 juillet 2020 09:37)
Merci Claire ! :)
Caroline (dimanche, 26 juillet 2020 05:57)
Bravo et merci pour ces explications très complètes et très claires !
Sihame (lundi, 27 juillet 2020 12:19)
Merci Catoline :)